How to use ssh keys
Setting up public key authentication over SSH
SSH Keys server as a means of identifying yourself to a Secure Shell (SSH) server using public-key cryptography and challenge-response authentication.
- An SSH key is made up of two seperate keys -
- A Private Key - which should be only known to you and be kept private.
- A Public Key - which can be shared freely with any SSH server.
- A Private Key - which should be only known to you and be kept private.
- Advantages of using SSH Keys
- Your password is never sent over the network
- You can connect to multiple servers without having to remember to enter your password for each attempt.
- Your password is never sent over the network
- Below we will take you though some of the basic step of creating SSH keys.
NOTE if the file authorized_keys did not exist and you had to create it you must make sure it has the right file permissions in this case 600 (eg -rw------- ).
Linux
- ssh-keygen - is the tool you will use to generate an SSH key pair in Linux
$ ssh-keygen -t <type>
- The -t option will allow you to specify the type of encryption to use while creating the key pair. Here are your choices...
- DSA - 1024 bit algorithm
- RSA - 2048 - 4096 bit algorithm (recommended)
- ECDSA - Elliptic Curve Digital Signature Algorithm that provides smaller key sizes and faster operations.
- DSA - 1024 bit algorithm
- To create an SSH key that uses RSA you would type the following ...
ssh-keygen -t rsa
- You will be prompted for some information
Enter the file in which to save the key (/user/.ssh/id_rsa):
- You can just press enter here as it will save to your home space in a directory called .ssh
Enter passphrase (empty for no passphrase):
- Entering in a passphrase will give you more security - however if your overall goal is to not have to enter a password everytime you ssh to a server then you do not need to enter a passphrase.
- The entire process will look something like this
ssh-keygen -t rsa
Generating public/private rsa key pair.
Enter file in which to save thr key (/user/.ssh/id_rsa):
Enter passphrase (empty for no passphrase):
Enter same passphrase again:
Your identification has been saved in /user/.ssh/id_rsa.
Your public key has been saved in /user/.ssh/id_rsa.pub.
The key fingerprint is:
e7:38:47:65:25:71:ff:1c:ee:e4:a8:37:31:0d:58:80 user@server
The keys randomart image is:
+--[ RSA 2048]----+
|          ..+.o  |
|         E   = . |
|            =  ..|
|           + ...o|
|        S o   ooo|
|         =   o=. |
|        o o  .oo |
|         o  .o   |
|           .. .  |
+-----------------+
- You now have 2 files stored in ~/.ssh
- id_rsa - is the private key
- id_rsa.pub - is your public key
- id_rsa - is the private key
- Next you will want to copy your public keys to the remote server - you can use a protocol called ssh-copy-id
ssh-copy-id user@machine
NOTE if the file authorized_keys does not exist you will have to create it.
Windows
- PuTTY is a free implementation of Telnet and SSH for Windows
- PuTTY is a free implementation of Telnet and SSH for Windows
- You will want to download putty.exe and puttygen.exe
- You can use putty.exe to ssh to your servers and use puttygen.exe to generate an SSH Key to upload to your server so that you don't need to enter your password everytime.
- You can use putty.exe to ssh to your servers and use puttygen.exe to generate an SSH Key to upload to your server so that you don't need to enter your password everytime.
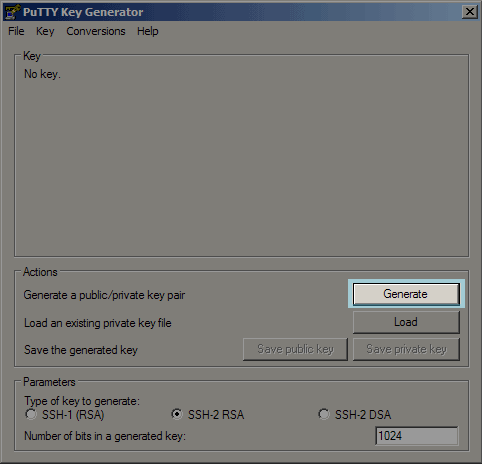
- Once downloaded click on the puttygen.exe icon
- Next Click on Generate to create a public/private key pair. Be sure under Parameters you select the type of key to generate.
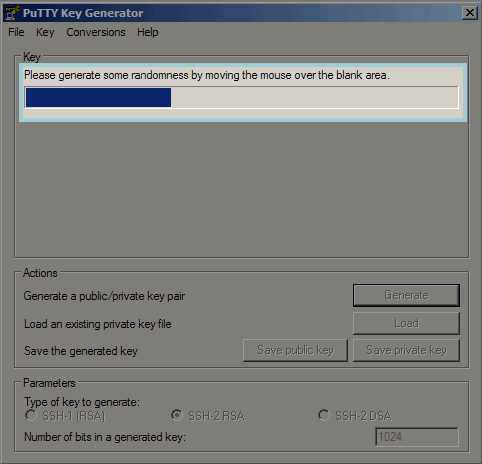
- Wait for the Generation to finish
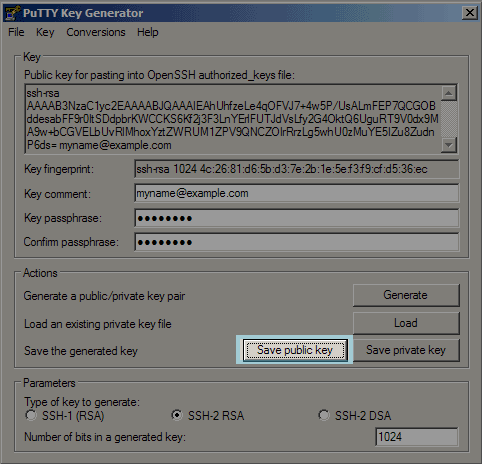
- Select Save Public Key to store this file to your local machine.
- This will save it to a .txt file - We suggest saving it to your Desktop or Documents folder for easy access.
- You can now copy the public key from the PuTTYgen Window and paste that into the authorized_keys file on your server.
- SSH to your server
- vim /.ssh/authorized_keys
- paste the contents from the PuTTYgen Window into the authorized_keys file
Mac
- Very similar to Linux - Just make sure you are using Mac OS X
- Open a Terminal window found in Go > Applications > Utilities > Terminal
mymac:~ user$ ssh-keygen -t rsa
Generating public/private rsa key pair.
Enter file in which to save the key (/Users/user/.ssh/id_rsa):
Creating directory '/Users/user/.ssh'.
Enter passphrase (empty for no passphrase):
Enter same passphrase again:
Your identification has been saved in /Users/user/.ssh/id_rsa.
Your public key has been saved in /Users/user/.ssh/id_rsa.pub.
The key finderprint is:
e7:38:47:65:25:71:ff:1c:ee:e4:a8:37:31:0d:58:80 user@mymac
The key's randomart image is:
+--[ RSA 2048]----+
|          ..+.o  |
|         E   = . |
|            =  ..|
|           + ...o|
|        S o   ooo|
|         =   o=. |
|        o o  .oo |
|         o  .o   |
|           .. .  |
+-----------------+
- You can then open the file id_rsa.pub in any text editor - and copy the contents and paste it into the authorized_keys file on your server.
- Or you can vi /Users/users/.ssh/id_rsa.pub
- Or you can vi /Users/users/.ssh/id_rsa.pub
ssh-rsa AAAAB3NzaC1yc2EAAAADAQABAAACAQDbssnZ8NweOd3i00gZX+iRY8s2bOYh7j+zc00ln/t6OLE66HVxo7OcYKoF0mN1W4hFXktlWaMs3JOBdTMF1tGySm1W8O+pXvporA/rb+2SBnpvD2kAa7AnuNzEBoJ89SGD2NC0rwXick9pOLTSKLy8rVBkEW6jZ4qut0kisIVtq/2jGEMSDmiGd1dPF2AmVJIpLYz2R5gFGMLW6TANXtH5+3VNtCu6ZfI0vFFNW1RfY7O8xWeov4Lu4qxAGI/59gvMUvtUVOycvxQilXjh9s7A1zohv+vYrjga8I2YUKK5JScMrL7ltZ1c31n3rsn5cQqcUhrpahqDS0KUe+rO3LzXiPX4LasIiaO7wnR9e3bm8T9eHCOQplhVqYWB5nW9pQIhu2wdZWVZSwjk9pMK3l0hGIHPVEqMUxnaNXXaYFIFAajnM/hw+/dzmlRNL9IUOGOZ1OvyZiuKhT2XI/5DJl3eReeD1lIjdF0aO0GFJXsq5tk0VjJqkiMEYiB3Th9qSqzP6lUq7Q48J7l6DVpPloNHXq7Fth9ofFU/p0iW0Ax5PIQCfkS7tBgW5gecJ5sR2F3QdXdC+DDbvJUXa3KO1CwepNYGm0nKmztiY7oEQ8nrB1MQsw6uEgj1MGzVkYKeRoEPAH2c1MJq+LjmUhxh0x0pRFeQYiccKl2v/AI0CA40Dw== user@mymac
- You will see it will normally start with the type of encryption ssh-rsa and may end with a description of what it is .. in this instance user@mymac
- This is what you will need to copy and add to the authorized_keys file on the server.
- This is what you will need to copy and add to the authorized_keys file on the server.
- SSH to your server
- cd .ssh
- vim authorized_keys
- Paste the contents from your mac id_rsa.pub into this file
NOTE if the file authorized_keys did not exist and you had to create it you must make sure it has the right file permissions in this case 600 (eg -rw------- ).
Related Articles
Router and Wireless Troubleshooting
Is your router getting power? Most of the time a reboot can often resolve: network issues poor website connections slow speeds dropped connections Doing an occasional reboot keeps the router acting like new. The reboot process is simple: Unplug your ...Shell Access
How do I activate my shell account? To activate your shell account, simply contact accounting or technical support. Why isn't shell access on by default? Having shell access enabled by default on all accounts presents a security risk. A shell account ...What is Spam?
What is Spam? Spam is a word adopted by the Internet community to describe mass-message posting via email or Usenet newsgroups. These messages are usually unsolicited and invasive commercial advertising, typically for get-rich-quick scams or to ...About FTP
What is FTP? FTP (File Transfer Protocol) is a protocol used to transfer files over a TCP/IP network (Internet, UNIX, etc.). For example, after developing the HTML pages for a Web site on a local machine, they are typically uploaded to the Web server ...Password Protecting a Directory With ".htaccess"
Introduction This document assumes you have a basic understanding of the UNIX shell. Web access control on XMission is a function of the web server. It lets you set permissions on who can access your web documents based on username/password, a group ...


