Webmail
- From your web browser (e.g.: Internet Explorer, Netscape, Opera), go to the URL (web address) http://webmail.xmission.com.
- Just below the welcome message, you will see the two fields Username and Password.
- Enter your XMission username in the field labeled Username, and enter your password in the Password field. Click on Log In.
How do I view a message?
Upon logging in, you should see a list of messages that are in your Inbox. (If not, click on the Inbox icon at the top of the window.) To view a message, click on the subject. You will be taken to a new page that displays the entire message.
How do I compose a new message?
Click on the Compose button at the top of the window. The Compose Window allows you to set, among other things, the message recipient's address (who you're sending mail to), the message subject, and the message contents. Simply fill out the appropriate fields at the top of the window (only the To: address is required, but the Subject: is suggested) and type your message in the large lower field. Once you've completed entering your message, you may choose to Spell Check your message text. Once you're done composing your new message, click the Send button to send the message to the recipient.
How do I send an attachment?
- While still in the Compose a message window, scroll down to the Attachments heading.
- In the empty Attachment field, you may either type the full path and file name of the file, on your computer, that you wish to attach, or you may click the Browse... button.
- After clicking Browse..., locate the file on your computer that you'd like to attach and click Open. You should now see the path and file name in the Attachment field.
- Click the Attach button to upload the file. You may do this with several files, but you should try to keep the total file size under 1 meg. If you wish to remove any of the attached files, click the check box next to the file name and click Remove Selected.
- Here is a list of filtered attachments that you cannot send or receive. Filtered Attachments
How do I reply to a message?
When viewing your message, there will be a reply option above the date. Click once on Reply, then type your message in the compose window. If the original message was sent to multiple recipients, and you'd like each of them to see your reply, use the "Reply to All" option.
How do I forward a message?
When viewing your message, there will be a forward option above the date. Click once on Forward, then add any comments you'd like in the composition window.
How do I delete a message?
There are a couple different ways to delete a message. The most intuitive method is to open the message, then click Delete. This will cause the message to follow the rules defined for deleting messages in your options.
Another option is, from the folder/mailbox the message is in, you can click the check boxes on the left of the message and then click the Delete option at the bottom of your window. This, too, will cause the message to follow the rules defined for deleting messages in your options.
Still another method is, after you've checked the message, click on the Mark As: menu and choose "Deleted". This will strike-through the message to show it as deleted. To remove messages marked as deleted, click on Purge Deleted at the bottom of your window. This will delete the marked messages permanently.
How do I move a message to another folder/mailbox?
- To move a message to another folder/mailbox, click the check box to the left of the message you wish to move. Next, in the upper-right hand side of your window, there will be an option that says Move|Copy and a menu that says Messages to:. From that menu, select the folder/mailbox you'd like to move the message to, then click Move.
How do I copy a message to another folder/mailbox?
You copy a message to another folder/mailbox the same way you move a message (see above), only you'll click Copy instead of Move.
How do I switch to another folder/mailbox?
To change your folder/mailbox view to a different one, click on the Folders icon at the top of your window, then select the folder/mailbox you'd like to view.
How do I change a message's status?
In the folder/mailbox view, click the check box next to the message(s) you'd like to change the status of, click the Mark as: menu and select the new status. You can also do this from the message view.
How do I search for messages?
Click on the magnifying glass icon at the top of the window. Fill out the fields according to how and what you'd like to search for, then click the search button near the bottom of the fields. If you would like to do another search you can either erase some of the data in the fields or click the "Reset" button to clear them all.
How do I set my preferences?
Click on the "Options" icon at the top of your window. Here you will see a short list of preferences and explanations for each.
- "Personal Information" is your identity. It is any information that shows on your outgoing messages.
- "Time Zone" is helpful if you're traveling and checking mail from somewhere other than the default time zone.
- "Filters" are useful for removing spam, filing messages to certain folders/mailboxes, or blocking that annoying someone you'd rather not get any more messages from. Setting filter rules is described in more detail below.
- "Message Viewing" only contains one option, and it's to filter message content for profanity.
- "Deleting and Moving Messages" sets your preferences for what happens when you delete a message or after a message is moved.
- "Maintenance Operations" has options to rename and clean up folders/mailboxes after a certain amount of time.
- "Display Options" sets how messages are sorted and displayed in a folder/mailbox view.
- "Message Composition" has options such as choosing an inline quoted character or draft folder/mailbox.
- "Login Tasks" has one option to set or remove the "Last Login" display.
- "New Mail" sets preferences for checking for new mail and notifying you.
- "Addressbooks" is, of course, your address book. More information about using your Addressbooks can be found below.
How do I create filter rules?
If you're just looking to block an email address from a person you've already gotten a message from, you won't need to create a filter manually. Open the message from the person you no longer want messages from, then click on "Blacklist". A new window will appear showing you your filter rules with a new one in place. To apply this to messages you've already gotten, click "Apply All Rules". All messages from that address will now be deleted. To create a new filter rule manually, click on the "Options" Icon at the top of your window, click on "Filters", then click on "Edit my filter rules". You will now see various ways to filter your mail. The easiest way to do it is to decide what the filter needs to look for, where it needs to look for it, and what it should do with the message if it finds it.
How do I use Addressbooks?
To add people to your address book, click on the "Addressbook" icon at the top of the window, click "Add", enter the information that you have available for the person, then hit "Save". To import an address book you already have, from the "Addressbook", click on Import/Export. Choose the type of address book you wish to import from the first drop-down menu, select the destination address book from the second drop-down menu, then click browse to find the address book on your hard drive. Click "Import" to complete the upload. You can export in the same way, but you'd chose your online address book as the source and the location on your local computer as the destination. The address book from XMission's previous WebMail program cannot be imported. You will need to re-enter the addresses manually. To search your address book, click on the "Search" icon in the Addressbook view. The search feature is simple; it searches for a name or an address you type into the search field. If you'd like to narrow your search, you can use the advanced search.
How do I set Vacation Mode?
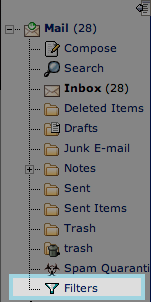
You can set a vacation mode to let people know you are out of the office. Choose Filters from the left side menu under mail - 
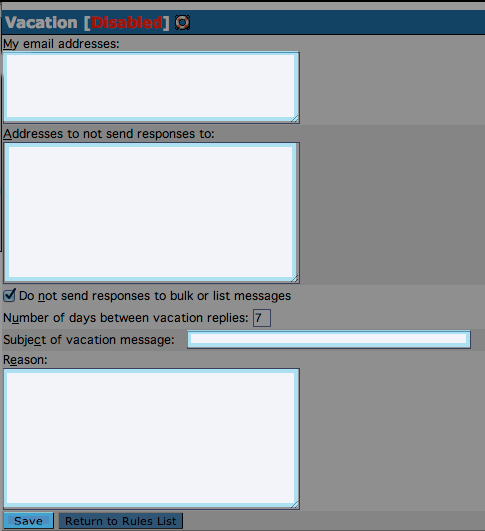
Next Choose Vacation from the top menu - 
Fill in the necessary fields - 
After clicking SAVE - click on Filters on the left menu again 
Next choose Show Detail Filter Rules - 
From here you can see that Vacation is set to enable - to Disable click on the green check mark on the right
How do I Forward all my emails?
You can forward all your emails to another email address. Here is how.
Choose Filters from the left side menu under mail - 
Next you can choose Show Detail Filter Rules - 
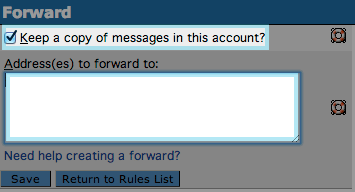
From here you can click on Forward to open the next screen - 
Fill out the necessary fields - If you want to keep a copy on the server make sure to check the box 
When you are done click Save and this Filter will automatically be enabled - to disable click on the green check mark on the right 
Compatibility issues with Internet Explorer 8
There is a known issue with Internet Explorer 8 which makes it difficult or impossible to navigate folders within our webmail system. To remedy the situation please try the following:
- Open Internet Explorer 8 and navigate to http://webmail.xmission.com.
- Select Tools->Compatibility View (This is a menu option in Internet Explorer itself, not on the web page).
- Select Tools menu and verify that Compatiblity View has a checkbox next to it.
- Close the browser.
- Open Internet Explorer 8 and navigate to http://webmail.xmission.com and login again.
Related Articles
New Webmail Interface
How do I log in to WebMail? From your web browser (e.g.: Firefox, Chrome, Internet Explorer, Safari), go to the URL (web address) http://webmail.xmission.com. Just below the welcome message, you will see the two fields Username and Password. (Your ...Email
Information Zimbra Email and Collaboration Suite Zimbra power tips on out XMission Blog Unlimited Shared Hosting Mail (Plesk Mail) Setup Instructions XMission.com Email Configuration Instructions Zimbra Email Configuration Instructions General Email ...Client Configuration for @XMission.com Email
These easy to follow instructions will help you configure your favorite client for use with your @xmission.com email service. For greater convenience, you can always use XMission Webmail. Recommended Email Settings Incoming Server Information ...What is Spam?
What is Spam? Spam is a word adopted by the Internet community to describe mass-message posting via email or Usenet newsgroups. These messages are usually unsolicited and invasive commercial advertising, typically for get-rich-quick scams or to ...XMission Email - Outlook 2016
First Time Setup To add your XMission email address in Outlook 2016, first go to the File menu option near the upper left-hand corner within Outlook as seen below. Within Info selected, click Add Account. Type in your email address, then click on ...